
How to Use Sewing Patterns:
The Ultimate Guide
Sewing Patterns can help you make some super cute clothes, but they can also be quite confusing if you’re not familiar with them. If you want to know how to print and cut a PDF Pattern then check out this article. If you have your pattern ready to go then keep reading to learn how to use sewing patterns
First Things First
If you think you will use this pattern more than once then its a good idea to trace it onto some new paper
Why?
- This way you always have the original
- If you accidentally mess up and cut the pattern in half then you still have the original to re-trace from
- If you want to make the pattern again in a bigger size you can just trace that size
- Without tracing from the original it is very easy to mess up and then you may have to print and tape or buy (if it was a physical pattern) all over again!
- Also helps if you want to make any alterations to the pattern – like make it a bit longer
Onto What?
- Most paper will work well but if it is transparent it will make the process much easier.
- Baking paper is a good example of something to trace on as it is translucent enough to see the original through it and also fairly inexpensive.
- If you want something a bit more durable I would recommend lightweight plastic (like dust sheeting you would find in a DIY store). Dust sheeting is great as it won’t crease as easily, is easier to pin and can take a bit of a beating without changing the shape of the pattern.
How?
- Simply lay your tracing paper over the original pattern
- If your tracing paper is not wide enough to cover the whole pattern then just do it pattern piece by pattern piece.
- With pencil draw the line of the size you want to make
- Neaten it up so it is as close as possible to the original
- Go over with a thick pen
- make sure you transfer any markings
- write on each piece what it says on the original pattern (e.g. centre front cut x2)
- Cut out your traced version
How To Lay Your Pattern Onto Your Fabric
Fold
- If your pattern contains x2 of any pieces then it is probably easiest to fold your fabric in half so you will get double of each piece you cut
- If using very lightweight flimsy material like chiffon it will likely shift and move as you cut, so don’t fold your fabric. Instead do it in single layers, piece by piece.
- Always remember that if the fabric is folded then the pieces will be symmetrical. So if you want two pieces to be identical not symmetrical then do not fold it.
Grain Line
- Some patterns will have a line marked ‘grain’ or ‘grainline’.
- This will help you know which way round the pieces should go
- The grainline is generally the same as the selvedge of the fabric (the edge of the fabric that has not been cut but is just where the fabric ends. Sometimes it will have markings or writing on it)
- If your pattern doesn’t have a grainline or you don’t know where it is on your fabric then it is generally quite easy to work out
- Stretch your fabric horizontally and vertically, one will stretch more than the other
- You want the most stretch going around your body not up and down you
Lay out ALL pieces
- Lay out all of your pattern pieces on to your fabric
- You want to arrange them so that they are facing the right way for the grain (remember stretch goes around you)
- Try and arrange them as close together as possible while leaving a gap around the edges
- This way you will not waste too much fabric
- Remember that your fabric is folded so think about what will happen when it is opened out (you don’t want a big hole in the middle!)
- Any pieces that have a ‘fold’ line need to be placed on the folded edge of the fabric
- The fold line should NOT be cut
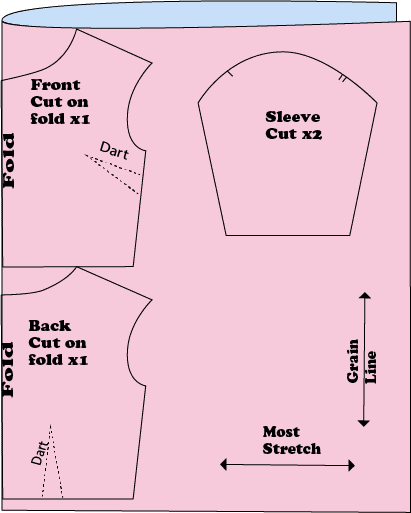
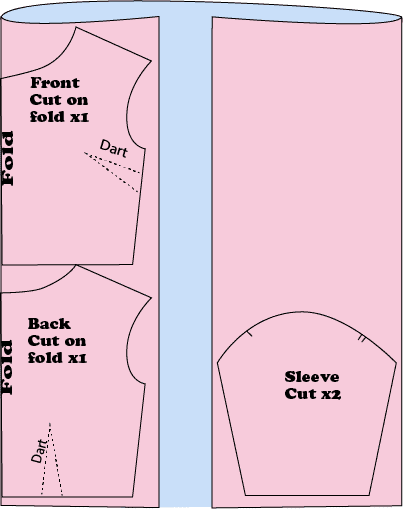
Some examples
While this layout will produce all the right pieces it will waste a lot of fabric
This layout will help save more of the fabric. Each piece can be neatly cut out and there will be more fabric for the next project
How to Cut the Pattern and the Fabric?
Rotary Cutter
- Rotary cutters are a great way to speed up the process of cutting out your fabric pieces.
- Instead of pinning it is better to use pattern weights to hold all the pieces in place, as pins may get in the way when cutting.
- Make sure your fabric is on top of a self-healing cutting mat
- Place pattern weights in every corner and the centre of each piece
- Cut around each piece
- Try to apply even pressure as you push the blade for a nice even cut
- Replace your blades regularly to ensure they don’t get blunt
Scissors
- First all the pieces need to be pinned into place
- Pin every corner of each piece and then the rest of the pins should be about a hand width’s apart from one another
- Your pins should be perpendicular to the edge of the fabric and facing outwards (head of the pin closer to the middle, sharp end at the edge)
- Try to keep your fabric as flat as possible as you cut to ensure it does not shift
- Cut slightly larger than you think and then trim off any excess
- Do not use fabric scissors for anything other than fabric as they will get blunt
How To Transfer Markings?
There are lots of ways, but these are the easiest
Pin
- You can use pins to mark wherever there were inside lines on the pattern
- If it’s just a little dash to help match pieces up later on, just pin wherever the marking is on each piece of the fabric
Draw
- You can draw on fabric with tailors chalk or soap if you want a more budget friendly option
- Make a little hole at the point of the dart and then use chalk or a pencil to mark that dot on your fabric
- Then mark where the two diagonal lines start and use a ruler to draw the lines onto the fabric, finishing at the dot
Tack
- Tailor’s Tacking is a great way to mark things like darts
- To do this you will need a needle and thread
- Thread the needle and cut the thread but do not tie a knot
- Push the needle through the pattern and the fabric wherever the marking is
- Come back up through the fabric and pattern (if you are marking a line then come back up further up the line – about 1 or 2 cm
- Cut the thread / unthread the needle
- Repeat if you need more tacks along a line
- Then lift the pattern off carefully so that the tacks stay in the fabric
Now you know how to use a sewing pattern!
And if you wan’t to try out your new knowledge then check out our PDF Patterns on Etsy for you next project!